Simple Chicken & Rice Soup

Simple Chicken & Rice Soup

Simple Chicken & Rice Soup

Soup is good at any time of the year; I learned that early on at the cafe'.  I was amazed that no matter what the weather, soup was in demand.  This is a simple, hearty soup with broad appeal, from toddlers to seniors.  It is so simple, you will find yourself making it again and again!  It freezes well, so you can double the recipe and have extra on hand in the freezer, ready to enjoy at a moment's notice.

Serves 8

1 large onion, coarsely chopped

3 large celery ribs, cut into ¼” slices

3 medium carrots, peeled and cut into ¼” slices

2 medium bone-in, skin-on chicken breasts

1 cup long-grain brown rice

1 teaspoon salt

3 quarts chicken broth

¼ cup roughly-chopped fresh flat-leaf parsley

In a large pot combine all ingredients, except parsley.  Bring just to a boil, reduce heat to a simmer, cover and cook for one hour.  Check and skim any foam that accumulates periodically.  (Maintain a low simmer, as allowing it to boil will cause the soup to be cloudy.)

Transfer the chicken to a cutting board and cool until it can be handled.  Discard the skin, and remove the meat from the bone.  Shred or chop the chicken into bite-sized pieces and return to the pot.  Add the parsley.  Taste and adjust seasoning.  If the soup is too thick, add water or broth until it reaches the desired consistency.  Reheat and serve.

Elegant Breakfast Braid

Click the arrow for a demonstration of how to assemble the braid!

This is a gorgeous and scrumptious dish to serve for breakfast or brunch any time to want to make an impression!  Though it looks difficult, it is really quite simple.  Puff pastry purchased right in the freezer section of the grocery is very forgiving and equally beautiful when it's baked.  This recipe is easily doubled for a crowd. Check out the video for a visual how-to on filling and finishing the braid for baking!

  1             sheet Puff Pastry, thawed

  1             tablespoon unsalted Butter

  1/2           cup frozen Hash Brown potatoes, thawed

  1/2           cup diced Red Bell Pepper

  1/4           cup Diced Onion

  1/2           cup finely chopped ham or bacon

  6             large Eggs

  1             tablespoon minced fresh chives

  2             ounces Cream Cheese, softened

  1             tablespoon Orange Juice

  1             large Egg

  1 1/2         teaspoons water

  1             tablespoon grated Parmesan Cheese


Preheat oven to 400-degrees if baking immediately.

Melt butter in a large nonstick skillet over medium-high heat.  Add potatoes and sauté 5 minutes. Stir in bell pepper and onion; sauté 3 minutes.

Whisk eggs and add to skillet, cook until just set, then season with salt and pepper to taste. Off the heat, stir in cream cheese and juice until blended. Spread out on a sheet pan, cover and refrigerate until cooled.

Unfold sheet of puff pastry onto a floured work surface.  Roll pastry to a 12"x10" rectangle and transfer to a piece of parchment cut to fit a baking sheet.  Trim edges of pastry. Spread the egg mixture down the center 1/3 of the pastry, leaving a 3/4" space at the top and bottom of the pastry. On each side of the egg mixture, cut the pastry into 3/4" strips at a 45-degree angle.  Fold the top and bottom sections of pastry over the egg mixture; fold the pastry strips alternately over the eggs; it will look like a braid. Lift parchment and place braid on a baking sheet.

Combine remaining egg and water and beat until well combined.  Brush over the top and sides of braid and sprinkle with cheese. (Braid may be covered and refrigerated overnight or frozen at this point to bake later. To freeze, cover loosely and freeze until solid.  Remove the freezer and wrap tightly in plastic wrap. If frozen, thaw overnight in the refrigerator before baking.)

Place in oven and bake for 25-30 minutes, or until golden brown all over. Remove from oven and allow braid to sit for 5 minutes, then lift off of baking sheet with parchment.  Slice and serve, or place on a platter and slice, garnishing with chives to serve family style.

Herb Roasted Lamb Chops

These are my Mother's favorite!  So easy and delicious, you will be making these any time you find beautiful loin lamb chops in the market.  Check out the video for a complete how-to!

Serves 4

4             large garlic cloves, finely minced

1              tablespoon fresh thyme leaves, lightly crushed

1              tablespoon fresh rosemary leaves, lightly crushed

2             teaspoons kosher salt

1              tablespoon extra virgin olive oil

8             1 ¼-inchthick lamb loin chops

1              tablespoon olive oil


Mix first 5 ingredients together in a large bowl.  Add lamb, turn and coat with mixture.  Let marinate at room temperature for at least 30 minutes and up to 1 hour.

Preheat oven to 400-degrees.  Heat the remaining 1 tablespoon of oil in a very large, heavy, ovenproof skillet over high heat.  Add lamb; cook until browned, about 2-3 minutes per side.  Transfer skillet to oven and roast lamb chops to desired doneness, about 9-11 minutes for medium-rare.  Transfer lamb to platter, cover, and let rest 5 minutes before serving

Herbed Lemon Smashed Redskin Potatoes

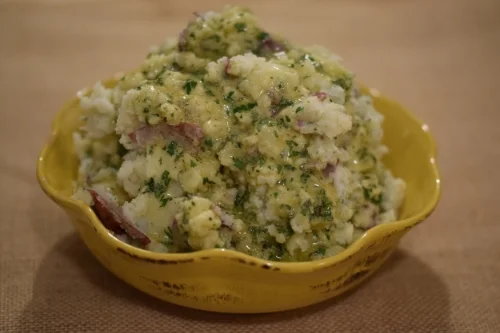
This is my favorite potato dish!  I read a recipe by Bobby Flay, and decided that the Midwest needed their own version of this dish.  Replacing the butter and heavy cream (though I am a fan!) with a vinaigrette and a touch of sour cream produces a dish that is bursting with flavor! If you can find Meyer lemons, replace the juices and zest in the recipe-my favorite! Check out the video for more detailed instructions, and I predict this is going to become a favorite in your kitchen, too!

4 servings

FOR THE VINAIGRETTE

  • 1 tablespoons lemon juice
  • 1 tablespoon orange juice
  • 1 ½ teaspoons Dijon mustard
  • ¼ cup extra-virgin olive oil
  • Kosher salt and freshly ground black pepper
  • 1 teaspoon finely chopped fresh flat-leaf parsley leaves
  • ½ teaspoon finely chopped fresh thyme

FOR THE POTATOES

  • 2 pounds small redskin potatoes, quartered
  • Kosher salt
  • ½ cup sour cream
  • Finely grated zest of 1 lemon
  • 2 tablespoons finely chopped fresh flat leaf parsley
  • 2 teaspoons finely chopped fresh thyme
  • 2 teaspoons finely chopped fresh chives
  • Ground black pepper

Preparation

  1. For the vinaigrette: In a medium bowl, whisk together the juices and mustard until combined. Slowly add olive oil, whisking until emulsified. Season to taste with salt and pepper. Stir in parsley and thyme; set aside.
  2. For the potatoes: Put potatoes in a medium saucepan, cover with cold water by 2 inches and add 1 tablespoon kosher salt. Bring to a boil over high heat, reduce to simmer, cover and cook until fork-tender, about 20 minutes. Drain well, return potatoes to the pan and put back over low heat, stirring a few times, to dry well.
  3. Add sour cream, lemon zest, parsley, thyme and chives. Season to taste with salt and pepper. Gently crush with a potato masher until combined. If desired, potatoes may be covered and kept in a warm oven for up to 30 minutes. To serve, transfer to a bowl and drizzle with the vinaigrette while still hot.

Feast of Eden's Cranberry Vinaigrette

Cranberry Vinaigrette

Cranberry Vinaigrette

This is such a delicious, different vinaigrette.  It is extremely important that unsweetened concentrated cranberry juice is use.  If it's not concentrated the dressing will not work.

·         ¼           cup concentrated, unsweetened cranberry juice

·         ¼           cup red wine vinegar

·         1 ½         teaspoons Dijon mustard

·         ½            teaspoon salt

·         ¼            teaspoon freshly ground black pepper

·         3            Tablespoons honey

·         ½            cup extra virgin olive oil

·         1            cup vegetable oil


Combine first six ingredients in the container of a blender and combine.  Add the olive and vegetable oils and process until it is well blended. Transfer to a container with lid.

Chill before serving.  Dressing may need to be stirred or shaken if it appears the ingredients have separated.

Makes about 2 cups

Feast of Eden's Creation Salad

Creation Salad

Creation Salad

This was the best-selling salad at the café and with good reason!  Crispy spring greens & Romaine are the perfect foil for the combination of veggies, fruits, spiced nuts, goat cheese and croutons.  The Cranberry Vinaigrette sets the whole thing off perfectly.  This just might become your favorite salad, too!
The ingredients listed are per serving; you can prepare as much or little as you like.  Simply layer in a salad bowl in the order given and serve!  I often make this in several layers in a large bowl for a crowd, essentially several salads “stacked” in the bowl.  That way everyone gets all of the ingredients, and the latecomers aren’t left with just lettuce!  One of the secrets to a great salad is to have crisp, dry, cold salad greens.  All components should be fresh, dry, and cold.  Nobody loves a soggy, wilted salad!

2 cups greens (I mix freshly cleaned and chopped Romaine with clean, crisp, dry spring greens)

Large sprinkle of red onion, sliced paper thin (adjust according to your onion love!)

8-10 pieces of English cucumber (Slice, then halve the slices for the perfect size piece!)

½ cup Apple cubes (Use a sweet-tart apple such as Jonathon, Pink Lady, or Honeycrisp)

1 ounce of a mild, fresh goat cheese, crumbled (Substitute Feta if you’re not a goat cheese fan)

2-3 Tablespoons dried cranberries

2 Tablespoon Sweet & Spicy Nuts

Small handful of croutons(Toss stale sourdough bread cubes with some olive oil & salt. Toast in a skillet over medium heat until golden brown, stirring occasionally.  You can use purchased, but why?)

Cranberry Vinaigrette

Sweet & Spicy Salad Nuts

nuts.jpeg

These nuts are the perfect finishing touch to the Creation Salad, or to just about any other salad.  Whip up a batch and keep them on hand at all times-you may get hooked!

 3         cups broken pecans

  1         extra large egg white

  1/2      teaspoon ground cinnamon

  1/4      teaspoon ground cumin

  1/8      teaspoon ground cayenne pepper

  1/2      teaspoon smoked paprika

  1/4      cup sugar

  1/2      teaspoon salt

Place the egg white in a medium mixing bowl and beat with a whisk until light and very frothy.  Beat in the spices, sugar, and salt until very well combined. 

Preheat oven to 325-degrees F.

While the oven heats allow the egg white mixture stand, allowing sugar to dissolve; then whisk again to recombine ingredients. Add pecans to mixture and stir until all of the nuts are coated and everything is evenly combined.

Spread out evenly on a half sheet pan that has been sprayed with non-stick spray.  Bake the pecans in the preheated oven for 10 minutes.  Stir pecans and rearrange on pan, and continue baking until browned and beginning to crisp, another 15 minutes or so.Using a spatula, scrape nuts onto another baking sheet and allow to cool completely.  Nuts will crisp as they cool!

Store pecans in an airtight container.  They will keep at room temperature 14 days. (Freeze or refrigerate if storing longer.)

Rhubarb Crisp with a Hint of Orange

Rhubarb Crisp with a Hint of Orange

Rhubarb Crisp with a Hint of Orange

I love all fruit crisps, but in spring when rhubarb is available this is my favorite dessert!  Orange is definitely the friend of rhubarb; when they are combined the orange brings out the flavor of the rhubarb and just slightly calms the sour notes that are such a strong feature of rhubarb.  This is amazing on its own, but adding a scoop of vanilla ice cream or a dollop of whipped cream takes it over the top.  Enjoy!

Preheat oven to 375-degrees.  Grease a 11 X 7-inch pan and set aside.

Combine the following in a large bowl:

2/3 cup sugar

2 Tablespoons flour

1 Tablespoon orange zest

Add:

6 cups of rhubarb, cut into 1-inch (measure after it is cut!)

2 Tablespoons freshly-squeezed orange juice

Stir together until well combined, then spread the mixture evenly in the prepared baking dish. 

Stir together the following until well combined:

1 cup packed brown sugar

¾ cup flour

¾ cup rolled oats

½ teaspoon salt

Cut in the following until crumbly.  (I use a pastry blender or my cool fingers!)

3 ounces or 6 Tablespoons soft butter

¼ cup vegetable shortening

Spread the topping evenly over the rhubarb in the pan.  Bake for 35-50 minutes, or until it is a deep golden brown and it is bubbling up in the center.

 (If the crisp browns too much before it bubbles in the center, cover loosely with foil until it is baked through.  If it doesn’t bubble in the center, it will be runny and have a raw flavor in the center.  Ovens vary, so use your eyes and nose to tell when it is done!)

Ham, Swiss & Asparagus Panini

Ham, Swiss & Asparagus Panini

Ham, Swiss & Asparagus Panini

This is without a doubt my favorite spring panini! The sauce is the perfect complement to all of the ingredients, so don't make it without-it will not compare.  This was a favorite at the cafe every spring-hopefully it will be one of yours, too!

(Serves 4)

24 stalks of medium fresh asparagus, woody stems removed

2 teaspoons vegetable oil, plus more for brushing on sandwiches

8 large slices sourdough bread

¾ cup real mayonnaise

Freshly-squeezed juice from half a large lemon

Lemon zest from a large lemon

1 ½ teaspoon stone ground mustard’

¼ teaspoon coarsely-ground fresh black pepper

¼ cup grated Parmesan

2 ounces deli-style ham, thinly-sliced or shaved

8 slices Swiss

Preheat oven to 400-degrees. Place the asparagus on a rimmed baking sheet, drizzle with oil then rub the asparagus with the oil. Roast in the preheated oven for 8-12 minutes, until tender-crisp.  Remove from the oven and set aside.

While the asparagus roasts, combine the mayonnaise, lemon juice, lemon zest, mustard, black pepper and Parmesan.

Lay the bread out on a counter or cutting board.  Spread one side of each piece with the mayo mixture.  Layer a slice of Swiss on four of the slices (break into pieces to fit, if needed) followed by 6 pieces of asparagus (alternate so tips show on both ends), ¼ of the ham, and another slice of cheese.  Using a pastry brush, brush the sandwiches lightly on both sides with the vegetable oil.

Preheat a Panini grill to high.  Place the sandwiches on the grill and close the grill.  Grill until they are a deep golden brown and the cheese is melted all the way through the sandwich.  Remove from grill and let sit for one minute, then cut in half and serve immediately.

Quick Spring Pasta

Quick Spring Pasta with Asparagus and Spinach

Quick Spring Pasta with Asparagus and Spinach

It's finally May, and spring is settling in, which makes me so very happy!  After the long, long winter, the warm weather and longer days literally draws us outdoors; walking, gardening, mowing the now green grass.  And for many, it means running children to sporting events. (How well I remember those days.)  All of that activity really works up an appetite.  But quick is best during this time of year (so we can all play outdoors as long as possible)! So this week I'm sharing a recipe that celebrates all of the delectable springtime ingredients that are on hand, and makes preparing a dinner that is easy and completely satisfying lightening fast!  This recipe is great on its own with a simple side salad and a piece of crusty bread, or add a piece of grilled chicken or fish on the side for the truly big appetite.  (If you don't enjoy asparagus you could use spring peas, instead.  Later in the year, use your imagination and switch out the spinach and asparagus for other seasonal veggies.)  So go ahead, stay outside as long as you like-you'll have plenty of time to whip up a great dinner!  Blessings!

(Serves 4)

3     Tablespoons olive oil

4     cloves of garlic, finely minced

¼     teaspoon crushed red pepper (more or less, to taste)

12    ounces spaghetti or linguine, Gluten-free if need be

2    cups 1” asparagus pieces, woody ends removed

4     cups fresh spinach, roughly chopped

1    lemon, zest and juice

2 ½ ounces grated Parmesan or Asiago Cheese

Bring about 6 quarts of salted water to boil in a large pot.  Add pasta, bring to a boil, and set timer for 2 minutes less than the recommended time to cook pasta to al dente.

Meanwhile, heat a large skillet or pan with sides over medium heat, add olive oil, garlic and crushed red pepper.  Reduce heat to low and gently sauté until garlic is softened (do not let garlic brown!  If heat is too high, garlic will become bitter.) Remove ¾ cup of water from the pasta pot and add to the garlic mixture.  Add lemon zest and juice and bring to a boil, allow to reduce while pasta finishes cooking.

When time is complete for the pasta, add the asparagus pieces and set timer for the additional 2 minutes.  (Place a colander or strainer in the sink to drain pasta.)  When time is up, add the chopped spinach to the pot, stir through, and then drain in strainer.

Add the pasta and vegetable mixture to the skillet and stir in well.  When well-combined, add 2 ounces of the cheese and stir until very well combined.

Serve immediately sprinkled with the remaining cheese and more red pepper flakes, if desired.

Spring Asparagus Soup

 Spring Asparagus Soup

 Spring Asparagus Soup

Asparagus!  Oh my, it's without a doubt my favorite spring vegetable.  All winter I long for the fresh, local spears that the warm weather in May will bring.  Yes, I purchase imported asparagus during the winter when the craving gets to be too much, but alas, it is never able to completely satisfy.  Nothing compares to the amazing asparagus that grows here in the Midwest!  I have literally pages of recipes for the fabulous stuff, and it is a challenge to prepare even a fraction of them during "Asparagus Season".  But there is one recipe that was made as often as possible at the cafe, because it was so beloved by our customers (and me!); Spring Asparagus Soup. 
This recipe is the result of hours of experimentation with recipes.  Finally, I came up with what I thought was the best version, with pieces of asparagus tips floating in a silky, delicate, amazing concoction.  And the customers confirmed!  So, here is my favorite asparagus soup recipe.  Be sure to have some sourdough baguette or French bread at the ready-it's great to dip into!  I can't help but believe you will have found your new favorite spring soup recipe!  Blessings!

(Serves 4)

1       pound fresh asparagus, washed, trimmed and cut into 1-inch pieces, reserve tips separately

4       Tablespoons butter

2       medium shallots, finely minced

1       clove garlic, finely minced

½      teaspoon salt

¼       teaspoon ground black pepper

 1       quart chicken broth*

1        cup heavy cream

4        teaspoons corn starch**

Salt and Pepper, to taste

*(I reserve the liquid from steaming the asparagus and use it to make the chicken broth using chicken base-1 Tablespoon to one quart water.  Eliminate the salt in the recipe and adjust the seasoning at the end; chicken base tends to be salty.  This adds just that much more asparagus flavor to the soup. If you have chicken stock on hand, use it to steam the asparagus!) 

** Using cornstarch rather than flour makes this a gluten-free soup, provided the chicken broth contains no gluten.

Place the asparagus pieces (steam tips separately) in an asparagus pot, steamer insert, or into a saucepan with about a cup of water.  Steam pieces until tender. Remove from cooking vessel, and then steam the tips until just tender. Reserve the tips to add to the soup at the end.

Melt the butter in a small stockpot or very large saucepan.  Sauté the shallots over medium heat until tender and translucent (do not brown), then add the garlic, salt (if not using chicken base), and pepper and cook for another minute or so, stirring constantly.  Add the chicken broth and the asparagus pieces.  Bring to a boil, then reduce heat to a simmer, cover, and cook until the asparagus is extremely tender. 

Remove from the heat and either puree with an immersion blender, or in a blender in batches.  Puree until the soup is smooth and silky-be patient! Return to the heat and bring to a simmer.

Place the cornstarch into a small bowl and work the cream in, making sure there are no lumps.  Slowly stir into the soup, and simmer until thickened. 

Add the asparagus tips to the soup.  Taste and adjust the salt and pepper.  Serve.

Morels & Gruyere Cheese on Grilled Toast

Morels and Gruyere Cheese on Grilled Toast

Morels and Gruyere Cheese on Grilled Toast

It's April, the second week of, and the weather has been less than spring-like for the past seven days.  Snow, sleet, rain and even some hail have been alternating with brief glimpses of the sun this past week, with below-normal temperatures prevailing, leaving us longing for more than just the occasional tease of spring!  Those longing thoughts lead me down a trail, literally, of some favorite spring memories of foraging for one of my favorite foods; morels!  Now, if you hail from the Midwest, these lovely fungi are more familiar as "sponge mushrooms", or any number of other common names, to you.  But regardless of what we call them, they are arguably more than worth the hours spent hunting for them (or the price to buy them), each spring.
During my childhood, my mother would take us out into the woods to find them, and it was always such a thrill when we did. Usually we found only a few, but they were delicious in our scrambled eggs the next morning, and occasionally the conditions would be just right and we would find many.  Oh, happy day!  Years later, I trekked to Michigan with family just to hunt for them.  Up there, they could literally be found in big patches, just as promised by my then father-in-law, Don.  Though I thought the tales he told of finding them like that were exaggerations ("fish stories" for fungus, so to speak), they were indeed true. While never experiencing that back home in Indiana, as my family grew I could always count on my son, Nate (the outdoors man), going out into the woods and finding some for us to enjoy each spring. 
Morels are a delicacy, to be sure, but I had no idea of just how much so back then!  It boggles my mind now when I think of how we would gather the family and fry literally pounds of them, pile them on a platter, and sit down to a meal with fried morels (dredged in flour and a touch of cornmeal, fried in lard or shortening with a bit of butter-how rich!) as the entree.  We called it a "mess" of mushrooms!  Since I can't forage for them, I now have to purchase them, and the cost is prohibitive to consuming them that way!  Those foraged "sponge mushrooms" we enjoyed then cost between $30 and $45 per pound here in Chicagoland during the height of the season.  Definitely a splurge. 
For you who have experienced them as I did, or enjoyed them at a fine-dining establishment, you appreciate these earthy morsels of goodness.  To make it easy for all of you who already love them, and for those who haven't partaken of them yet but are curious as to what all the fuss is about, I'm sharing a recipe that highlights morels, without breaking the bank!  I adapted this recipe from one by one of my favorite chefs and cookbook authors, Patricia Wells.  Crispy, cheesy and decadent with both morels and more traditional mushrooms, this is a great appetizer or accompaniment to soup or a salad.  Definitely try this recipe! 
And warm weather hurry up and get here already.............

Morels and Gruyere Cheese On Grilled Toast

1 ounce dried morels (if you are fortunate to have FRESH morels, the equivalent is 3-4 ounces)

1 tablespoon unsalted butter

3 ounces fresh mushrooms, washed and thinly sliced (I like baby bellas)

8 slices firm bread (I used a dense multi-grain, a large French or sourdough baguette works, soft bread will not hold up well in this recipe)

½ cup sour cream (or creme fraiche, if you can find it-there's a recipe coming later for this!)

4 ounces Gruyere cheese, freshly grated (plus extra for sprinkling on before grilling)

Sea salt and freshly ground black pepper to taste

A small handful of fresh chives, minced

  1. Cover the morels with boiling water and set aside for 30 minutes. Drain them and rinse with cold water, then cut in half lengthwise. Rinse again, making sure they are cleaned of any grit or sand, and drain well.
  2. Preheat the broiler.
  3. In a medium-sized saucepan, melt the butter over medium heat. Add the morels and the fresh mushrooms and cook until they have absorbed the butter and wilted, several minutes.
  4. Toast the bread on both sides under the broiler.
  5. Add the sour cream to the mushrooms, increase the heat to medium-high and cook until the sour cream has reduced by half, several minutes more.
  6. Add the 4 ounces of cheese to the morel-and-sour cream mixture and cook, stirring constantly, just until the cheese is melted and incorporated into the mixture. Season with salt and pepper.
  7. Place a generous tablespoon of the mushroom-and-cheese mixture onto each piece of toast, sprinkle with a bit of the extra Gruyere, then liberally with chives and broil just until hot and bubbling. Cut in half to serve as an accompaniment or into quarters to serve as an appetizer.   Serve immediately.

Vintage Mayonnaise Cake

I am sooo delighted that winter's icy grip is finally melting away, and we're starting to see some consistently warmer weather here in Chicagoland, as well green grass and a few spring flowers! Easter Sunday was pretty chilly, but no snow gave us another reason to celebrate the day.  The sunrise was clear and bright and altogether inspirational as we gathered with our congregation for Sunrise Service (an indoor event this year, as I shared earlier).  I was also delighted that several of you decided to make Feast's Favorite Quiche recipe!  That is what's inspired me to share today's recipe!

The quiche recipe has mayonnaise in it, a somewhat surprising ingredient.  My friend Karen, who made a pretty quiche with the recipe and shared it with the accounting department, and I had a rather in-depth conversation about the virtues of mayonnaise!  That conversation took me back to one of my favorite childhood food memories, Mayonnaise Cake.  I think I was about 10 (so what, 25 years ago??  Ha!) when this cake started showing up at all the church dinners and family get-togethers.  I LOVED it!  That delectable food memory sent me searching for the recipe so that I can make it once more-and share it with all of you! 

The mayonnaise in the recipe replaces the traditional eggs and fats. I think chocolate frosting is the best way to top it, but Seven-Minute Frosting is also a scrumptious option.  This cake mixes up in minutes and bakes fast.  I had a lady once tell me that she and her family ate it right out of the oven with butter!  Haven't tried it, but hey, how bad could it be?  However you choose to try it, do try it.  It's not fancy, but it is tasty and oh-so-quick to make, a nice way to celebrate the beginning of Spring! 


Mayonnaise Cake


1 cup water

1 cup mayonnaise

1 teaspoon vanilla extract

2 cups all-purpose flour

1 cup sugar

¼ cup baking cocoa, sifted if lumpy

2 teaspoons baking soda

¼ teaspoon salt


In a large bowl, combine the water, mayonnaise and vanilla until well blended. In a large bowl, combine the flour, sugar, cocoa and baking soda; gradually beat into mayonnaise mixture until blended.

Pour into greased 11-in. x 7-in. baking pan. (I made mine in 2 round cake pans and layered it-however, I wouldn't recommend it.  Too tender and it was difficult to work with!)

Bake at 350° for 30-35 minutes or until a toothpick inserted near the center comes out clean.

 Cool completely.

Frost with your choice of frosting, or sift confectioners’ sugar over the top for a lighter version.

Feast's Favorite Quiche

                                               &n…

                                                                                                                  Yum!  Quiche with a crispy salad for lunch. 

Feast of Eden's Favorite Quiche

We served this quiche as a special a few times each month at the cafe, and at catered events.  I varied the ingredients and came up with some lovely combinations, such as Chicken & Artichoke, Asparagus & Bacon, and on so on.  It was served with a green salad on the side, and some customers liked to add a cup of soup, as well.  I learned quickly that quiche of any kind is crazy popular!  It was such a blessing when The Daily Herald (a Chicago-area newspaper that wisely had editions featuring the different suburbs) featured Feast in their Northwest Suburb Food Section,  and this quiche was one of the showcased dishes.  Needless to say, a surge of quiche-loving customers from all over the place soon became loyal customers. Quiche rocks, and I know you and yours will love this recipe! 

1 9-inch pie shell, blind baked

1/3 cup thinly-sliced green scallions, tops and light green parts

1 teaspoon butter

4 large eggs

1/2 cup real mayonnaise

2 Tablespoons all-purpose flour

1 cup half and half cream

1 cup frozen chopped spinach, thawed and squeezed dry

1/2 cup ham, cut into 1/4-inch cubes

8 ounces shredded Cheddar cheese

Preheat oven to 375-degrees Fahrenheit.

In a small glass bowl, combine scallion and butter.  Cover and microwave on high for 30 seconds, or until fragrant and softened a bit.

Beat eggs in large bowl until they are thoroughly broken up with no white streaks remaining.  Add mayonnaise and beat until there are no lumps.  Sprinkle flour over the top of the mixture and whisk in until well combined.  Slowly stir in cream and mix until thoroughly incorporated.  Add green onion mixture, spinach, ham and cheese; mix well.

Pour into pie shell. Bake in preheated oven for 30-40 minutes, rotate dish after 20 minutes.  Check after 35 minutes baking time, but be sure to bake until the quiche is golden brown and set in the center.  (Ovens vary, so use your eyes and nose to determine when it is done!)